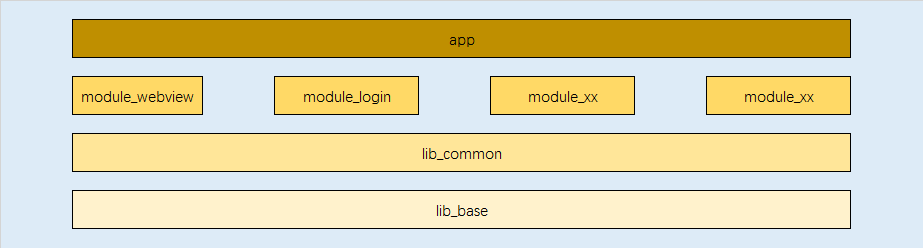
组件化结构
源码:WebView_demo
AutoService 路由 + 接口下沉:避免 app 对 module_webview 中的类的直接引用
1、在 lib_base 中创建一个类,并封装一个方法——让 ServiceLoader 加载指定 type 的 Service,并且返回第 1 个查找到的 Service:
1
2
3
4
5
6
7
8
9
10
11
12
13
14
15
16
| package io.weichao.lib_base.service_loader;
import java.util.ServiceLoader;
public final class ServiceLoaderX {
private ServiceLoaderX() {
}
public static <T> T load(Class<T> service) {
try {
return ServiceLoader.load(service).iterator().next();
} catch (Exception e) {
return null;
}
}
}
|
2、接口下沉,在 lib_common 中定义一个 Service 接口,接口中的方法将由 module_webview 中的类实现。
1
2
3
4
5
6
7
8
9
10
11
| package io.weichao.lib_common.auto_service;
import android.content.Context;
import androidx.fragment.app.Fragment;
public interface IWebViewService {
void startWebViewActivity(Context context, String url, String title, boolean isShowActionBar);
Fragment getWebViewFragment(String url, boolean canNativeRefresh);
}
|
3、module_webview 实现接口中的方法,并且使用路由 AutoService 注册其 Service type(需和实现的接口一致)。
先添加 AutoService 的依赖:
1
2
3
4
5
6
| dependencies {
annotationProcessor 'com.google.auto.service:auto-service:1.0-rc7'
implementation 'com.google.auto.service:auto-service:1.0-rc7'
}
|
1
2
3
4
5
6
7
8
9
10
11
12
13
14
15
16
17
18
19
20
21
22
23
24
25
26
27
28
29
30
| package io.weichao.module_webview;
import android.content.Context;
import android.content.Intent;
import androidx.fragment.app.Fragment;
import com.google.auto.service.AutoService;
import io.weichao.lib_common.auto_service.IWebViewService;
import io.weichao.module_webview.utils.Constants;
@AutoService({IWebViewService.class})
public class WebViewServiceImpl implements IWebViewService {
@Override
public void startWebViewActivity(Context context, String url, String title, boolean isShowActionBar) {
if (context != null) {
Intent intent = new Intent(context, WebViewActivity.class);
intent.putExtra(Constants.TITLE, title);
intent.putExtra(Constants.URL, url);
intent.putExtra(Constants.IS_SHOW_ACTION_BAR, isShowActionBar);
context.startActivity(intent);
}
}
@Override
public Fragment getWebViewFragment(String url, boolean canNativeRefresh) {
return WebViewFragment.newInstance(url, canNativeRefresh);
}
}
|
4、app 使用调用 lib_base 中 ServiceLoaderX 类封装好的方法,查找注册的 Service type 为 IWebViewService 的类,如果找到了,说明该 Service 在某个 module 中有实现类,再调用其实现的方法:
1
2
3
4
| IWebViewService webviewService = ServiceLoaderX.load(IWebViewService.class);
if (webviewService != null) {
webviewService.startWebViewActivity(MainActivity.this, "https://www.baidu.com", "百度", true);
}
|
让 module_webview 拥有独立运行的能力
1、gradle.properties 添加开关控制 module 是以 application/library 方式编译:
1
2
|
module_webview_is_application=false
|
2、module_webview 打包时需要获取配置信息:
1
2
3
4
5
6
7
8
9
10
11
12
13
14
15
16
17
18
19
20
21
22
23
| if (module_webview_is_application.toBoolean()) {
apply plugin: 'com.android.application'
} else {
apply plugin: 'com.android.library'
}
android {
defaultConfig {
if (module_webview_is_application.toBoolean()) {
applicationId "io.weichao.module_webview"
}
}
sourceSets {
main {
if (module_webview_is_application.toBoolean()) {
manifest.srcFile 'src/main/AndroidManifest.xml'
} else {
manifest.srcFile 'src/main/manifest_library.xml'
}
}
}
}
|
3、app 打包时需要获取配置信息,当 module_webview 是 application 时不可用:
1
2
3
4
5
| dependencies {
if (!module_webview_is_application.toBoolean()) {
implementation project(":module_webview")
}
}
|
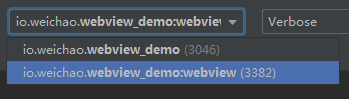
让 module_webview 运行在独立进程,并与主进程通信
注册 Activity 时声明运行的进程
1
2
3
4
5
6
7
8
9
10
11
12
| <manifest xmlns:android="http://schemas.android.com/apk/res/android"
package="io.weichao.module_webview">
<uses-permission android:name="android.permission.INTERNET" />
<application android:usesCleartextTraffic="true">
<activity
android:name=".WebViewActivity"
android:process=":webview"
android:theme="@style/Theme.AppCompat.Light.NoActionBar" />
</application>
</manifest>
|
建立 webview 进程与主进程的连接并保持连接,由主进程处理 Web 请求(这里使用了命令模式)
1、创建 webview 进程到主进程的 AIDL,用于处理 Web 的请求:
1
2
3
4
5
| package io.weichao.module_webview;
interface IWebviewProcessToMainProcessAidl {
void handleWebCommand(String commandName, String paramsJson);
}
|
2、在主进程——创建 Service,用于接受 webview 进程的连接:
1
2
3
4
5
6
7
| public class MainProcessCommandService extends Service {
@Nullable
@Override
public IBinder onBind(Intent intent) {
return MainProcessCommandManager.getInstance();
}
}
|
MainProcessCommandManager 中的 Command 是使用 AutoService 注册的,处理 Web 请求时会根据根据 name 属性查找已注册的 Command,并调用其方法:
1
2
3
4
5
6
7
8
9
10
11
12
13
14
15
16
17
18
19
20
21
22
23
24
25
26
27
28
29
30
31
32
33
34
35
36
37
38
39
40
41
| public class MainProcessCommandManager extends IWebviewProcessToMainProcessAidl.Stub {
private static MainProcessCommandManager sInstance;
private static HashMap<String, Command> sCommandMap = new HashMap<>();
public static MainProcessCommandManager getInstance() {
if (sInstance == null) {
synchronized (MainProcessCommandManager.class) {
sInstance = new MainProcessCommandManager();
}
}
return sInstance;
}
private MainProcessCommandManager() {
ServiceLoader<Command> serviceLoader = ServiceLoader.load(Command.class);
for (Command command : serviceLoader) {
if (!sCommandMap.containsKey(command.name())) {
sCommandMap.put(command.name(), command);
}
}
}
@Override
public void handleWebCommand(String commandName, String paramsJson) throws RemoteException {
MainProcessCommandManager.getInstance().executeCommand(commandName, new Gson().fromJson(paramsJson, Map.class));
}
private void executeCommand(String commandName, Map params) {
Command command = sCommandMap.get(commandName);
if (command != null) {
command.execute(params);
}
}
}
|
抽象出的命令:
1
2
3
4
5
| public interface Command {
String name();
void execute(Map paramsMap);
}
|
3、在 webview 进程——自定义 WebView,建立 webview 进程与主进程的连接,并将接收到的 Web 的请求通过 AIDL 交给主进程:
1
2
3
4
5
6
7
8
9
10
11
12
13
14
15
16
17
18
19
20
21
22
23
24
25
26
27
28
29
30
31
32
33
34
35
36
37
38
39
40
41
42
43
44
45
46
47
48
| public class BaseWebView extends WebView {
private static final String TAG = "BaseWebView";
public BaseWebView(Context context) {
this(context, null);
}
public BaseWebView(Context context, AttributeSet attrs) {
this(context, attrs, 0);
}
public BaseWebView(Context context, AttributeSet attrs, int defStyleAttr) {
this(context, attrs, defStyleAttr, 0);
}
public BaseWebView(Context context, AttributeSet attrs, int defStyleAttr, int defStyleRes) {
super(context, attrs, defStyleAttr, defStyleRes);
init();
}
public void init() {
WebviewProcessCommandDispatcher.getInstance().initAidlConnection();
DefaultWebSettings.getInstance().setSettings(this);
addJavascriptInterface(this, "jsInterface");
}
public void registerWebViewCallBack(WebViewCallBack webViewCallBack) {
setWebViewClient(new DefaultWebViewClient(webViewCallBack));
setWebChromeClient(new DefaultWebChromeClient(webViewCallBack));
}
@JavascriptInterface
public void takeNativeAction(final String paramsJson) {
Log.i(TAG, paramsJson);
if (!TextUtils.isEmpty(paramsJson)) {
final JsParam jsParam = new Gson().fromJson(paramsJson, JsParam.class);
if (jsParam != null) {
WebviewProcessCommandDispatcher.getInstance().executeCommand(jsParam.name, new Gson().toJson(jsParam.param));
}
}
}
}
|
1
2
3
4
5
6
7
8
9
10
11
12
13
14
15
16
17
18
19
20
21
22
23
24
25
26
27
28
29
30
31
32
33
34
35
36
37
38
39
40
41
42
43
44
45
46
47
48
| public class WebviewProcessCommandDispatcher implements ServiceConnection {
private static WebviewProcessCommandDispatcher sInstance;
private IWebviewProcessToMainProcessAidl iWebviewProcessToMainProcessAidl;
public static WebviewProcessCommandDispatcher getInstance() {
if (sInstance == null) {
synchronized (WebviewProcessCommandDispatcher.class) {
sInstance = new WebviewProcessCommandDispatcher();
}
}
return sInstance;
}
public void initAidlConnection() {
Intent intent = new Intent(BaseApplication.sApplication, MainProcessCommandService.class);
BaseApplication.sApplication.bindService(intent, this, Context.BIND_AUTO_CREATE);
}
@Override
public void onServiceConnected(ComponentName name, IBinder service) {
iWebviewProcessToMainProcessAidl = IWebviewProcessToMainProcessAidl.Stub.asInterface(service);
}
@Override
public void onServiceDisconnected(ComponentName name) {
iWebviewProcessToMainProcessAidl = null;
initAidlConnection();
}
@Override
public void onBindingDied(ComponentName name) {
iWebviewProcessToMainProcessAidl = null;
initAidlConnection();
}
public void executeCommand(String commandName, String params) {
if (iWebviewProcessToMainProcessAidl != null) {
try {
iWebviewProcessToMainProcessAidl.handleWebCommand(commandName, params);
} catch (RemoteException e) {
e.printStackTrace();
}
}
}
}
|
4、在 app 注册命令:
1
2
3
4
5
6
7
8
9
10
11
12
13
14
15
16
17
18
| @AutoService({Command.class})
public class CommandShowToast implements Command {
@Override
public String name() {
return "showToast";
}
@Override
public void execute(final Map parameters) {
Handler handler = new Handler(Looper.getMainLooper());
handler.post(new Runnable() {
@Override
public void run() {
Toast.makeText(BaseApplication.sApplication, String.valueOf(parameters.get("message")), Toast.LENGTH_SHORT).show();
}
});
}
}
|
如果需要,可以将处理结果从主进程返回给 webview 进程,并通过回调显示
1、创建主进程到 webview 进程的 AIDL,用于返回 Web 请求的结果:
1
2
3
4
5
| package io.weichao.module_webview;
interface ICallbackFromMainProcessToWebviewProcessAidl {
void onResult(String callbackName, String response);
}
|
2、修改 webview 进程到主进程的 AIDL,将用于回调的方法作为参数传递:
1
2
3
4
5
| import io.weichao.module_webview.ICallbackFromMainProcessToWebviewProcessAidl;
interface IWebviewProcessToMainProcessAidl {
void handleWebCommand(String commandName, String paramsJson, in ICallbackFromMainProcessToWebviewProcessAidl callback);
}
|