Hexo + GitHub Pages 搭建 blog
本文最后更新于:1 年前
Reference
- Hexo Documentation
- node.js
- git
- 手把手教你用Hexo+Github 搭建属于自己的博客
- window下配置SSH连接GitHub、GitHub配置ssh key
- NexT
- hexo的next主题个性化教程:打造炫酷网站
- Hexo文章图片存储选七牛(当然支持MD都可以)
- Markdown 代码高亮
环境搭建
安装 Node.js
安装 Git
安装 Hexo
在本地创建文件夹,比如 D:\weichao\hexo
windows + r 调出运行,输入 cmd,进入刚才创建的目录
输入npm install -g hexo-cli
warn 不会影响正常使用
输入npm install hexo --save,等待安装完成
输入hexo -v,显示
说明 Hexo 安装完成
clone Hexo 项目
在本地创建文件夹,比如 D:\weichao\hexo\config
windows + r 调出运行,输入 cmd,进入刚才创建的目录
输入hexo init
输入npm install
输入hexo g
输入hexo s,会提示浏览器访问地址:
在任意浏览器中输入该地址:
关联 Hexo 和 GitHub Pages
windows + r 调出运行,输入 cmd,进入 D:\weichao\hexo\config
配置 Git
输入用户名、邮箱
git config --global user.name "xx"
git config --global user.email "[email protected]"

修改 D:\weichao\hexo\config\_config.yml
deploy:
  type:
为
deploy:
  type: git
  repo: [email protected]:yourname/yourname.github.io.git
  branch: master
安装 git 扩展
npm install hexo-deployer-git --save
配置 SSH
生成密钥
进入 C:\Users\itpiz\.ssh
右键 -> Git Bash Here
ssh-keygen -t rsa -C "[email protected]"

id_rsa 是密钥,id_rsa.pub 是公钥
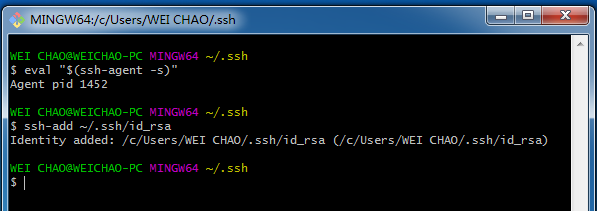
添加密钥到 ssh-agent
eval "$(ssh-agent -s)"
ssh-add ~/.ssh/id_rsa
添加密钥到 GitHub
复制 id_rsa.pub 中的内容

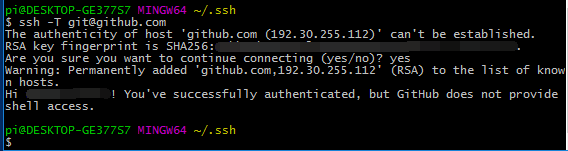
测试 ssh keys 是否设置成功
输入 ssh -T [email protected]
设置主题
windows + r 调出运行,输入 cmd
进入 D:\weichao\hexo\config
clone 主题
git clone https://github.com/iissnan/hexo-theme-next themes/next
修改配置文件
修改 D:\weichao\hexo\config\_config.yml
theme: landscape
为
theme: next
清除缓存
hexo clean
验证主题
hexo s -debug
创建文章并上传
windows + r 调出运行,输入 cmd
进入 D:\weichao\hexo\config
新建一篇博客:
hexo new post "article title"
生成并部署
hexo d -g

Hexo + GitHub Pages 搭建 blog
https://weichao.io/53e1cd844b9c/